Chess game - more features
In this section, we are going to add some more features to our chess application. In the process, we will introduce other important pieces for modeling behavior with state machines: history pseudo-states and transient states. We will again reflect on the maintainability of state-machine-based interface implementation.
New features’ specifications
We are going to add two new features: a clock timing the game, and a way to pause that clock. The clock will display the elapsed time since the game has started (which will be since the application started). The clock should be updated every second.
Interface-wise, this means adding a timer area where the clock is displayed. Clicking on the clock should suspend the clock, and clicking a second time on the clock should resume it. Ideally, the clock should blink if and only if paused.
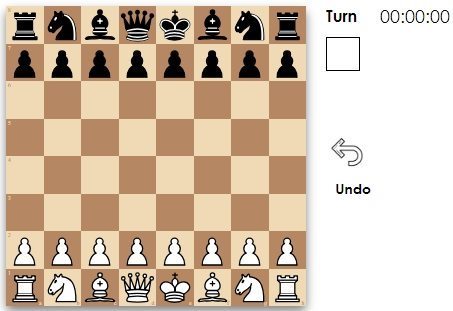
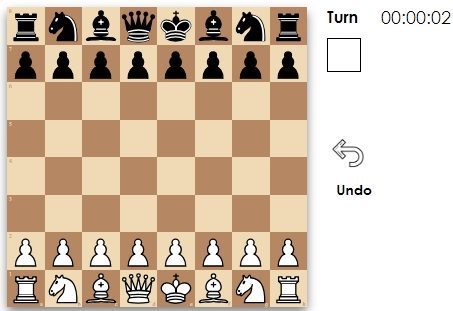
We have the following screens corresponding to different states of the application:
| Initial screen | 2s later |
|---|---|
 |
 |
Modification targets
As before, we will examine each of our three modules composing the application for modification purposes.
The machine
As we have seen, the machine simply translates events into commands. We have two new events here: a new elapsed second (SECOND_ELAPSED), and a click on the clock (CLOCK_CLICKED).
The SECOND_ELAPSED event should trigger the update of the clock. After that, any other events should be processed by the machine as before the SECOND_ELAPSED event. That means that, whatever control state the machine was in, it must trigger the specified commands and then return to that control state to resume its standard behavior. We have 5 atomic control states. We could, for each of those states, add a transition to the origin control state (unsurprisingly called self-transition or auto-transition). This is however not very maintainable. If later, we have a 6th control state, we have to remember to also add a transition for that new control state. In short, we have an invisible, undocumented logical dependency.
The click on the clock area should toggle pausing/resuming of the clock. If the game is not paused, then a CLOCK_CLICKED event should trigger the pausing of the clock. Any events coming in the machine while the game is paused should not trigger any action! When the game is resumed (CLOCK_CLICKED event received while the game is paused), the game should resume where it was. That means that whatever control state the game was in, it should return to that control state. Just like before, we could duplicate for each of the 5 control states, the transitions which implement this behavior.
Think about why they may amount to 15 in the worse case as an exercise.
If we would do the duplication for those two new features, we would end up with up to 15 new transitions! That is more than what we have already, and that would render the graph difficult to read. In the previous chapter, we showed how transitions from and to compound states were factoring a group of transitions between atomic control states into a single one involving the compound state. We are now going to introduce another such group factoring, with a different logic: history pseudo-state.
History pseudo-states are target control states, associated with a compound state. A transition targetting such a pseudo-control state is interpreted at run-time by the machine as a transition to the last control state the associated compound state was in, after the machine left that compound state. This is best explained with an example. The modelization of the two requested features is as follows:
Do you understand why this machine implements the aforedescribed behavior? You can imagine a user story which includes pausing the clock, map it to an event sequence, and run the machine in your head with those events. Do it! It is a good habit to manually check a machine vs. the expected behavior.
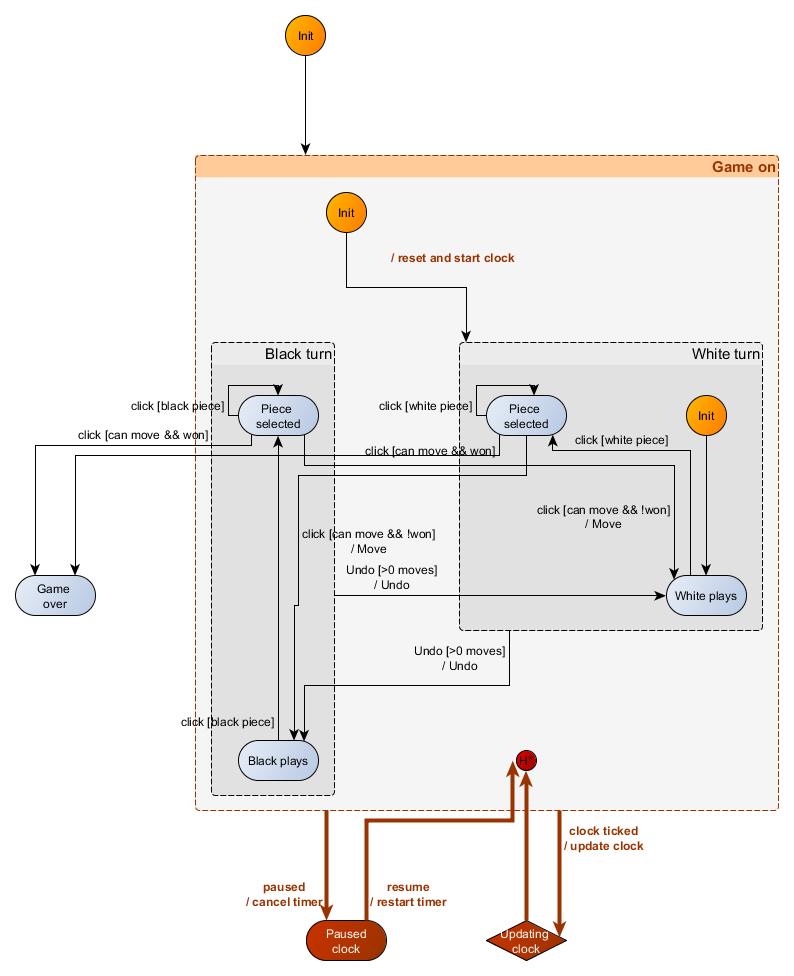
Our potentially 15 new transitions have been reduced to 4! The history pseudo-state is represented in the previous graph as a small circle with the label H*. It is called a pseudo-state because it is not an actual control state. It is a joker which is replaced at run-time, when the transition is taken, by an existing control state. Consider the following run of the machine:
Here the hyphen — does not mean null or an empty value but a default value. More details can be found in the API section
| Control state | H*(Game on.) | Event | New control state |
|---|---|---|---|
| White plays | — | White piece clicked | White piece selected |
| White piece selected | — | Game paused | Pausing |
| Pausing | White piece selected | White piece clicked | Pausing |
| Pausing | White piece selected | Game resumed | White piece selected |
| White piece selected | White piece selected | White piece clicked | White piece selected |
| White piece selected | White piece selected | Empty square clicked, legal non-winning move | Black plays |
The history pseudo-state for the Game on compound state is evaluated and has a non-default value when and only when the machine has exited the Game on compound state. That value is precisely the atomic control state the machine was in, just before exiting the compound state.
The history mechanism helps us represent economically behaviors such as interrupts (switch one behavior for another one temporarily) or co-routines (cooperate sequentially with another behavior to produce a combined behavior).
That is all there is to know for now about history pseudo-states. Let’s continue to use the previous modelization of our two new features and introduce a new type of control state termed transient state. Per the graph visualization, on receiving a TICK event, the machine will transition to the Updating clock control state… and immediately move on to the next control state, as defined by the possible guards specified for that control state. Here the transition is to the history pseudo-state. By immediately, we mean that the machine will synchronously transition to the next control state without, or before processing or receiving any other events on the way. Transient states are for that reason also called eventless states.
By orthogonal, we mean that the added pieces of state machine do not rely on, and do not modify any piece of extended state used in other parts of the machine.
Do you remember how in the previous tutorial we added props to our rendering React component, and that led us to have to reexamine all rendering commands of the state machine to pass the updated props list? We would very much like instead to add the features and modifying the minimal amount of code possible. We achieve this here, by replacing the default render handler of our <Machine> React component with our own customized handler.
Our custom render handler now expects the changed props rather than the full set of props necessary to handle the component. Where we might have had in the updateAndDisplayClock action factory:
{
  command: COMMAND_RENDER,
  params: { gameDuration: gameDuration + 1, draggable, width, position, boardStyle, squareStyles, onSquareClick, turn, status }
}
we instead have:
{
  command: COMMAND_RENDER,
  params: { gameDuration: gameDuration + 1 }
}
We have finished analyzing the impact of the new features on the machine. Because we have only added to the existing behavior features that are orthogonal to it, we do not have to modify any piece of state used by the existing state machine. This is a best case when it comes to maintainability.
Interfaced systems
The interfaced systems are two: the chess engine, and the output device (screen). We do not touch the chess engine here. We do have to update our rendering component:
function ClockArea(props) {
  const { next, gameDuration, isPaused } = props;
  const spanClass = isPaused ? ".blinking" : ".still.clock";
  return span(
    spanClass,
    { onClick: _ => { next({ CLOCK_CLICKED: void 0 })} },
    format(gameDuration)
  )
}

function ChessBoardWithInfo(props) {
  const { (...), gameDuration , isPaused } = props;
  (...)
  const clockAreaProps = { next, gameDuration, isPaused };

  return div(".game", [
    div(".game-board", [
      h(Chessboard, chessBoardProps)
    ]),
    div(".info", [
      div(".action", [
        h(InfoArea, infoAreaProps),
        h(ActionArea, actionAreaProps)
      ]),
      h(ClockArea, clockAreaProps)
    ])
  ])
}
Command handlers
We have to new commands: SET_TIMER and CANCEL_TIMER, which respectively schedule a tick, and cancel a scheduled tick:
Note how the setTimer and cancelTimer share a piece of state timerId. We could have put the timerId as a piece of state of the machine and pass that in the SET_TIMER and CANCEL_TIMER commands. We opted not to do so. This keeps the machine simpler. As an exercise, you can try to implement what we discarded here, to understand why our choice makes sense.
const timerFactory = () => {
  let timerId = void 0;
  return {
    setTimer: function setTimer(next, delay, effectHandlers) {
      const { setTimer: sT } = effectHandlers;
      timerId = sT(1000, _ => next({ TICK: void 0 }));
    },
    cancelTimer: function cancelTimer(next, delay, effectHandlers) {
      const { cancelTimer: cT } = effectHandlers;
      cT(timerId);
    },
  }
}
const {setTimer, cancelTimer} = timerFactory();
API dive
The transitions for the updated machine is as follows:
import { ACTION_IDENTITY, DEEP, historyState, INIT_EVENT } from "kingly"
(...)

const transitions = [
  { from: OFF, event: START, to: GAME_ON, action: ACTION_IDENTITY },
  { from: GAME_ON, event: INIT_EVENT, to: WHITE_TURN, action: resetAndStartTimer },
  { from: WHITE_TURN, event: INIT_EVENT, to: WHITE_PLAYS, action: displayInitScreen },
  { from: GAME_ON, event: TICK, to: UPDATING_CLOCK, action: updateAndDisplayClock },
  { from: UPDATING_CLOCK, event: void 0, to: historyState(DEEP, GAME_ON), action: ACTION_IDENTITY },
  { from: GAME_ON, event: CLOCK_CLICKED, to: PAUSED_CLOCK, action: pauseClock },
  { from: PAUSED_CLOCK, event: CLOCK_CLICKED, to: historyState(DEEP, GAME_ON), action: resumeClock },
  (...)
];
Note how historyState, exported by the Kingly library is used to encode a history pseudo-state. We introduced in this tutorial only one of the two history types, the most frequently used, called the deep history. We will not detail the second history type supported by Kingly until the need to do so emerge. It suffices to say that historyState(DEEP, GAME_ON) is the (deep) history pseudo-state associated with the control state GAME_ON.
We have achieved a more maintainable machine by specifying minimal render commands. In the context of React UI implementation, this is achieved by using a custom renderer. The Machine component from react-state-driven allows customizing the rendering of the application by setting a rendering function as the COMMAND_RENDER property of the effectHandlers prop of the <Machine> component. For instance, in this tutorial example:
This is similar to React’s this.setState(obj) which merges the current state with obj. We here merge the current props with the new ones.
effectHandlers: {
  [COMMAND_RENDER]: (machineComponent, renderWith, params, next) => {
    const newProps = merge(machineComponent.state.props, params);
    machineComponent.setState(
      {
        render: h(renderWith, Object.assign({}, newProps, { next }), []),
        props: newProps
      },
    );
  },
  (...)
},
The custom render handler is passed four parameters, the first of which being the React component which handles the application display concern. That component has a render property which is the React element to render. The handler is also passed the renderWith React component, passed by the user as prop of the <Machine> component. The params parameter corresponds to the params property of the render command. Finally next is an event emitter proxying events to the state machine.
Altogether now
The final implementation can be accessed here:
What we learned
In this tutorial, we learned two new types of control states: history pseudo-state and transient state. A history pseudo-state is linked to a compound state, and maps, at transition time, to an atomic state of that compound state. That atomic state is the last atomic state the compound state was in before the machine exited the compound state. Transient states are states with zero duration: the machine enters the transient state and exits it synchronously and immediately.
History pseudo-states are useful to implement interrupts or co-routines, passing the control flow temporary to another part of the machine. Transient states are useful to intercalate transitions/actions between sections of a state machine. Transient states and history control states, when used in conjunction with compound states may reduce significantly the complexity of the graph modeling the interface behavior.
We showed that better maintainability can be achieved as a result of design principles — passing the minimum of information necessary for a command to achieve its task, and separating the extended state into orthogonal parts.
We shown that Kingly’s clean architecture enables reuse. The dependency graph for our implementation is as follows (in orange are the parts of the implementation which we had to write):
We were able to write a two-player chess game in very little code, quickly and with good confidence that our UI will do what it is supposed to do! The key productivity factor here has been reuse. Reuse is a key benefit of clean architecture. In the following dependency graph, we outlined in orange the parts which we had to write. We reused all the rest with the net result that our chess UI needs to know very little about the chess game:

The dependency graph also shows that the state machine for the chess UI does not depend on React, hence we can reuse it with any UI rendering library. ChessBoardWithInfo being a pure component, it does not depend on the interfaced systems as is often the case with React components (for instance when fetching data at mount time). We can reuse it anywhere in any React application.
Lastly, we saw that Kingly and react-state-driven can be customized (open/closed principle). For instance, Kingly allows developers to inject dependencies in a machine, which facilitates testing. react-state-driven proposes a default renderer which can be amply customized.
Exercises
To check your understanding, you can try to add the following feature:
- display pieces that have been captured. HINT: The
ChessBoardcomponent has a dedicated property for that. The display feature should be toggled on and off by the players. By default captured pieces should not be displayed