Two-player chess game
In the previous sections, we saw how to implement a password meter, whose behavior is modelized with state machines. We illustrated basic concepts that will be constantly recurring, such as control states, extended state, transitions, guards, actions, commands. In this section, we will modelize a more complex interface, and illustrate advanced concepts like state nesting, compound control states, initial transitions, and command and effect handlers.
Specifications
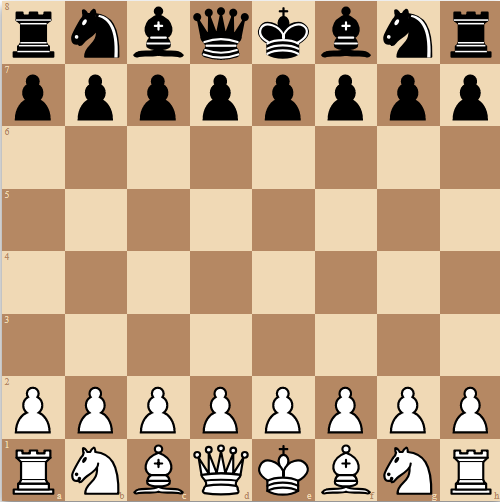
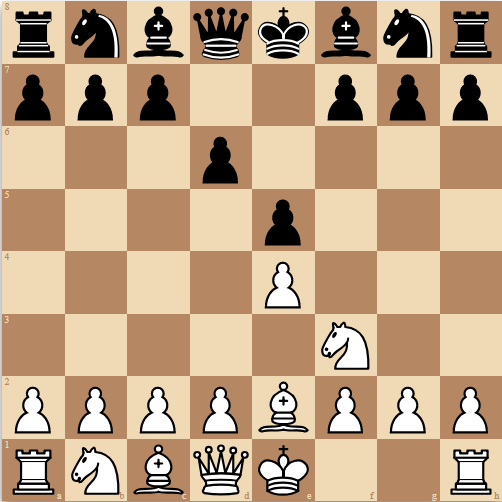
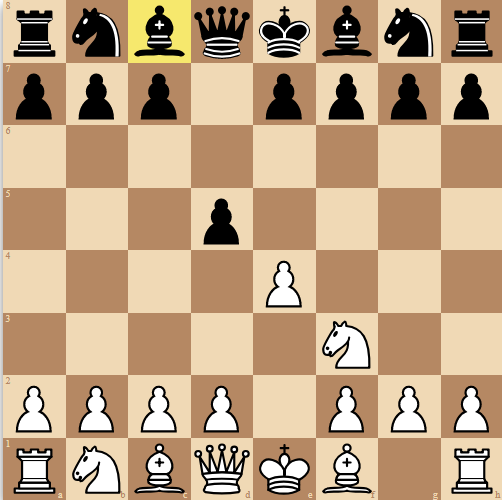
This application is a two-player chess game. Follows some screens sample of the application in different states:
| Initial screen | Random position | Piece selected |
|---|---|---|
 |
 |
 |
In short:
- The board starts in the chess game initial configuration
- The chess games rules apply
- game start with whites
- white plays, then black plays repeatedly till a game end condition is reached
- When a player whose turn it is to play clicks on one of his pieces, the piece is temporarily highlighted till the move is performed. The player must subsequently click on a board location to indicate the target location for the piece. The piece is removed from its current position and moved to the target location.
- When the game is over, as per the chess game rules, no more actions may be performed by the players.
Modelization
The previously informally specified behavior can be modelized formally with the following state machine:
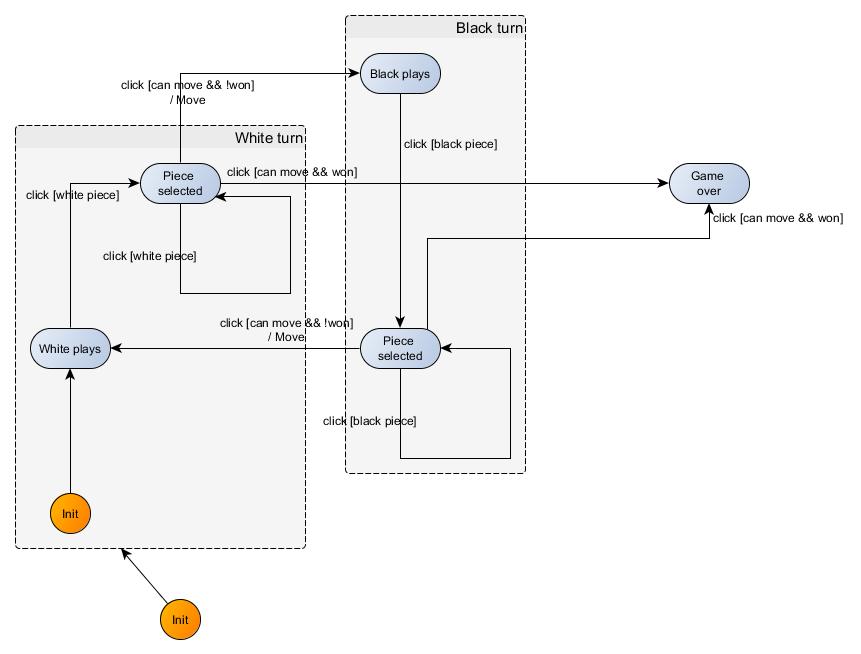
This machine presents new aspects vs. what we presented in the previous example. First of all, it has hierarchy. The White plays control state is nested within the White turn control state. We will say that White turn is a compound state, and in contrast, that White plays is an atomic state.
Compound states have an initial control state which is obtained as the target control state for the initial transition for that compound state. The initial transition is recognizable by the fact that its origin control state is the init control state — singled out from the other nodes using a smaller node size, and a different color. In our modelization, the initial control state for White turn is White plays.
In our modelization, the machine starts in the White turn initial control state. As this is a compound state, the machine then immediately moves to the initial control state of that state, which is White plays. As the latter control state is atomic, the machine remains in that initial control state and starts listening to events.
In the general case, the mechanism is identical. When a machine transitions to a compound state, it immediately transitions to the initial state for that compound state.
API dive
With Kingly, we will call that transition, an initial transition, and we will add it to the data structure passed to the state machine factory:
Note that the initial transition must use the exported INIT_EVENT as event. This event is reserved and cannot be used for other purposes.
{ from: WHITE_TURN, event: INIT_EVENT, to: WHITE_PLAYS, action: displayInitScreen },The following transition translated from the graph contains a unique guard:
{
    from: WHITE_PLAYS, event: BOARD_CLICKED, guards: [
      {
         predicate: isWhitePieceClicked, to: WHITE_PIECE_SELECTED, action: highlightWhiteSelectedPiece
      }
    ]
}However, it is recommended to configure a set of predicates that is mutually exclusive and which cover the entire space of possibilities. Ideally, one and only one predicate must be satisfied to avoid ambiguity. If multiple predicates are satisfied when evaluating a transition, the first satisfied predicate defined in the guard array is used for determining the transition to take.
If the guard’s predicate isWhitePieceClicked is not fulfilled, the machine will not change state nor execute any action factory. This contributes to the robustness of our interface.
We also have to indicate the nesting of control states in the states property as follows:
const states = {
  [OFF]: "",
  // `WHITE_PLAYS` is nested under `WHITE_TURN`
  [WHITE_TURN]: {
    [WHITE_PLAYS]: "",
    [WHITE_PIECE_SELECTED]: ""
  },
  [BLACK_TURN]: {
    [BLACK_PLAYS]: "",
    [BLACK_PIECE_SELECTED]: ""
  },
  [GAME_OVER]: "",
};
Furthermore, we will inject our event emitter and the chess engine with the optional settings parameter of the createStateMachine factory:
const gameFsm = createStateMachine(gameFsmDef, {
  debug: { console, checkContracts: null },
  // Injecting necessary dependencies
  eventEmitter,
  chessEngine
});We use here the chess engine to establish the validity of a move and detect the end game, but take care of reversing its effects. As a rule, guards and action factories must be pure functions. This avoids difficult-to-detect bugs where the game state is de-synchronized from the machine state.
Doing so makes the event emitter and engine visible in guards and action factories. For instance:
function isLegalNonWinningMove(extendedState, eventData, settings){
  const {chessEngine} = settings;
  const {pieceSquare} = extendedState;
  const square = eventData;

  const move = chessEngine.move({
    from: pieceSquare,
    to: square,
    promotion: "q" // always promote to a queen for example simplicity
  });
  const isLegalMove = move != null;
  const hasWon= chessEngine.game_over();
  chessEngine.undo();

  return isLegalMove  && !hasWon
}
Unlike the previous example, we need to inject the event emitter in the machine. As a matter of fact, the ChessBoard stateless React component exposes an onSquareClick handler which is run when a player clicks on a board square. We thus need to pass the click event to the machine and to do so we need to access the machine’s event emitter. In the previous example, as we were the author of the rendering component, we injected directly the event emitter as property of the component. We cannot do that here as we cannot (and should not) modify the source code for ChessBoard:
const onSquareClickFactory = memoize(function (eventEmitter){
  return function onSquareClick(square) {
    eventEmitter.next({[BOARD_CLICKED]: square})
  }
})

function moveWhitePiece(extendedState, eventData, settings){
  const { draggable, width, boardStyle, pieceSquare:fromSquare, whitePiecesPos: wPP, blackPiecesPos:bPP } = extendedState;
  const {eventEmitter, chessEngine} = settings;
  const square = eventData;
  const onSquareClick = onSquareClickFactory(eventEmitter);
  const squareStyles = '';
  // remove old white piece position and add new one
  const  whitePiecesPos = wPP.filter(x => x !== fromSquare).concat([square]);
  // remove old black piece position if any - case when a white piece gobbles a black one
  const  blackPiecesPos = bPP.filter(x => x !== square);

  // Use the chess engine to get the Forsyth–Edwards Notation (`fen`)
  chessEngine.move({from:fromSquare, to: square, promotion:"q"});
  const position = chessEngine.fen();
  chessEngine.undo();

  // As the move is over, reset the piece
  const pieceSquare= "";

  return {
    updates: [
      {pieceSquare},
      {position},
      {squareStyles},
      {whitePiecesPos},
      {blackPiecesPos},
    ],
    outputs: [
      {
        command: COMMAND_RENDER,
        params: { draggable, width, position, boardStyle, squareStyles, onSquareClick }
      },
      {
        command: MOVE_PIECE,
        params: {from: fromSquare, to:square}
      }
    ]
  }
}
The command MOVE_PIECE requests execution of the player’s move in the chess engine. As the implementation uses React, we use the react-state-driven library to integrate with React. This library is documented in its own section. It suffices to say for now that react-state-driven exposes a <Machine /> component which takes a machine, an event emitter, a React component to execute the render commands received from the machine, command handlers, and event handlers to actually run the received commands.
The usage with react-state-driven is to issue render commands whose parameters specify a screen to render. By default, the configured renderWith React component (here ChessBoard) is called with those parameters. For instance:
{
  command: COMMAND_RENDER,
  params: { draggable, width, position, boardStyle, squareStyles, onSquareClick }
},
will lead to rendering the React element ChessBoard(draggable, width, position, boardStyle, squareStyles, onSquareClick).
Non-render commands are addressed by specifying a command handler that receives in addition to the commands parameters, the event emitter, and the effect handlers. Effect handlers isolate the execution of effects into single-concern functions. In our example, the MOVE_PIECE command handler will be called as a function (next, {from, to}, effectHandlers), matching the parameters of the command (params: {from: fromSquare, to:square}):
Note how the chess engine is passed as effect handler, and made available to the MOVE_PIECE command handler. At testing time, it will be easy to replace the chess engine by a mock without recurring to an extra mocking library or tying tests to a specific framework. This is yet another facet of Kingly’s portable UI philosophy.
render(
  h(
    Machine,
    {
      fsm: gameFsm,
      eventHandler: eventEmitter,
      commandHandlers: {
        MOVE_PIECE: function (next, {from, to}, effectHandlers){
          const {chessEngine} = effectHandlers;
          chessEngine.move({
            from,
            to,
            promotion: "q" // always promote to a queen for example simplicity
          });
        }
      },
      effectHandlers: {
        chessEngine
      },
      renderWith: Chessboard,
      options: { initialEvent: { START: void 0 } }
    },
    []
  ),
  document.getElementById("root")
);
Implementation
We will use for the implementation the ChessBoard component from the chessboardjsx library, and the chess engine from chess.js. As ChessBoard is a React component, we will thus use React as a UI library. The chess.js library allows us to identify the validity of a player move and detect end game situations.
What we learned
This example introduced new concepts and learnings:
- control states can be nested — the machine is then called a hierarchical state machine
- compound states are control states that can have nested control states
- compound states specify their initial control state with an initial transition to the target control state
- the
createStateMachinefactory accepts an optional parameter which allows developers to inject dependencies into guards, and action factories - integration with React can be achieved manually or via the
react-state-drivenlibrary - the state machine controls the UI and necessitates only of React stateless components. No hooks, mixin, and other React paraphernalia to learn.
- a functional design that separates effect execution from other effectless computations, concentrates effect execution into single-concern functions, and gathers all orchestration concerns into a single state machine enables cohesion, low coupling, and easy testing.
Additionally, we illustrated the integration of Kingly with React through the react-state-driven library’s <Machine renderWith fsm eventHandler commandHandlers effectHandlers> component:
- the configured machine
fsmemits render commands whose parameters are props for therenderWithReact component - the
eventHandleris a subject which proxies events to the machinefsm - the
commandHandlersprop corresponds to the command handlers module of the Kingly’s preferred architecture - the
effectHandlersprop may be used to access and realize effects on the interfaced systems. Effects may also be realized directly in thecommandHandlers. However, we recommend delegating single effects to theeffectHandlerswhile leavingcommandHandlersin charge of coordinating effects to realize commands. This is separation of concerns at work, which pays off in terms of testing and maintainability of larger applications. However, for small demo applications like those in our tutorials, the benefits are smaller.